Multi-node
Exivity can be deployed on a single node, or on multiple nodes for HA and load balancing. This guide walks you through the steps to install some of the Exivity components on different nodes.
Multi-Node System Architecture
The following diagram outlines the various components that can be deployed on separate nodes:
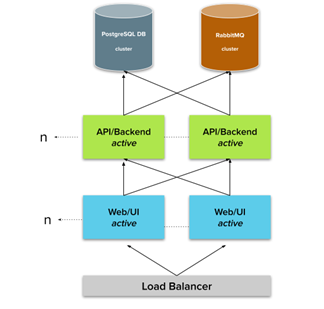
For larger environments, it is recommended to deploy each component on separate virtual machine nodes. As displayed in the diagram above, a typical multi-node deployment will consist of the following elements:
- Load Balancer (optional)
- An optional but recommended 3rd party load balancer may be used to ensure high availability of the Exivity front end web application.
- Exivity Web/UI node(s)
- 1 or more Exivity Web/UI nodes should be deployed to support the customer facing web application.
- Exivity API/Backend node(s)
- 1 or more Exivity API/Backend nodes should be deployed to support the customer facing web application.
- Storage
- In multi-node environments, it is advisable to provide a shared storage device (i.e. SMB/NFS) that can be accessed by the backend nodes
- PostgreSQL node or cluster
- Exivity solution relies on a PostgreSQL version 10 (or higher) compliant database engine.
- RabbitMQ node or cluster
- Exivity relies on a RabbitMQ version 3.8 (or higher) message broker
The platform is designed in such a way that adding and removing Exivity nodes should be relatively straightforward, which compliments thr potential growth or shrinkage of data processing needs.
Deploying a PostgreSQL node
Exivity highly recommends deploying your own PostgreSQL database cluster on Linux (or use a managed PSQL service from Azure, AWS or other vendors). To achieve High Availability, any PostgreSQL compatible cluster manager software may be used. At Exivity we have good experiences with pg_auto_failover, which is an open source PostgreSQL on Linux cluster manager (backed by Microsoft) in case you prefer to self-manage the Exivity PostgreSQL database.
When using a PostgreSQL database on a remote host, the database and user must have been created beforehand. To create the database, ask your database administator to execute a database create statement similar to the one below:
CREATE DATABASE exdb
WITH
OWNER = exadmin
TEMPLATE = template0
ENCODING = 'UTF8'
LC_COLLATE = 'en_US.UTF-8'
LC_CTYPE = 'en_US.UTF-8'
CONNECTION LIMIT = -1;
In addtion, make sure to set the following minimal (or higher) PostgreSQL configuration parameters:
shared_buffers = 2GB
work_mem = 32MB
wal_buffers = 64MB
max_prepared_transactions = 16
In case you prefer to install PostgreSQL on Windows, Exivity recommends installingthe PostgreSQL role together with the API/Scheduler backend components during the installation wizard.
Deploying a RabbitMQ node
Exivity highly recommends deploying your own RabbitMQ instance on Linux (or use a managed RabbitMQ service from AWS, CloudAMQP, or other vendors).
Deploying a Backend node
In order to deploy a backend node, the following steps need to be executed manually or automatically thru the use of the silent installer CLI interface.
After starting the installer, click Next and provide a valid license key when asked. After clicking Next again, the component screen will be shown:
-ef7455484c0b51d928777fda2431b385.png)
Ensure to deselect the Web Service . The API Service component can also be excluded, although in some cases it is recommended to have the API and Backend Services running on the same system. Please consult with Exivity support in case you are not certain what to select.
Click Next to continue. Then provide a folder for the Exivity program files, and afterward select a folder for the Exivity home files.
Provide a custom administrator username and password, or leave the default:
-51dd5be5e900b4f5f113503af589446a.png)
Now specify a remote PostgreSQL database instance, or select to install the PostgreSQL database locally on the API/backend node:
-d5ec9a5bf1d2bcdb13ab63c6aeb509a0.png)
When using a PostgreSQL database on a remote host, the database and user must have been created beforehand. To create the database, ask your database administator to execute a database create statement similar to the one below:
CREATE DATABASE exdb
WITH
OWNER = exadmin
TEMPLATE = template0
ENCODING = 'UTF8'
LC_COLLATE = 'en_US.UTF-8'
LC_CTYPE = 'en_US.UTF-8'
CONNECTION LIMIT = -1;
When you are finished configuring your PostgreSQL database settings, click the Next button to configure RabbitMQ. To use a remote RabbitMQ instance, deselect the 'Install Local RabbitMQ Engine' and provide the appropriate hostname, username, password, vhost and TCP port. In case you require TLS/SSL towards your RabbitMQ instance, select that checkbox as well:
-c544cb016f351ab6b6fdf16b414f5327.png)
Once the installation is finished, ensure to check 'Start the Exivity Windows Services' to start the Exivity services after clicking Finish.
-6666a3e76e8d095e96957a84f62db704.png)
In order to achieve High Availability for the Exivity API/backend node, it is advisable to leverage the HA capabilities of your hypervisor (i.e. vSphere HA). In case you want to achieve OS level HA, you may consider implementing a Windows Failover Cluster. Please reach out to [email protected] / support.exivity.com to learn more about this kind of configuration.
Silently install Backend node
The below example will silently install an Exivity API/Backend node while using a remote PostgreSQL database instance as well as a remote RabbitMQ instance using SSL:
start /wait Exivity_{version}_setup.exe /S ^
	/PSQL_INSTALLED=0 ^
		/PGUSER=exivityadmin /PGPASSWORD=S3cret!123 /PGHOST=db.exivity.local /PGPORT=5432 /PGDB=exivitydb ^
	/MQ_INSTALLED=0 ^
		/MQHOST=mq.exivity.local /MQPORT=5671 /MQUSER=exivity /MQPASSWORD=My5pecia1pas9 /MQVHOST=exvt /MQSSL=1 ^
	/WEB_INSTALLED=0 ^
	/JOBMAN_INSTALLED=1 ^
	/SCHEDULER_INSTALLED=1 ^
	/API_INSTALLED=1 ^
	/BACKEND_INSTALLED=1
Deploying a Web/API node
In order to deploy a Web/UI only node (with optional API), the following steps need to be executed manually or automatically thru the use of the silent installer CLI interface.
After starting the installer, click Next and provide a valid license key when asked. After clicking Next again, the component screen will be shown:
-1ac6a9f3cbf7bda9f67de144e1de3ad1.png)
Select the Web Service and optionally also the API Service. In some cases, the API can also be deployed on the front-end node, but if you are not certain, install only the Web Service on the front-end node, and the API Service on the backend node_._
Click Next to continue. Then choose a folder for the Exivity program files, and afterward select a folder for the Exivity home files.
In the following screen, it will be required to specify the remote host and port of your Exivity API node:
-b58507b0da1770de3c8aaacaf50924ec.png)
Ensure that the Exivity API host is active and accepting connections. After clicking the Next button, the installer will issue a connection attempt to the Exivity API host
Once the installation is finished, ensure to check 'Start the Exivity Windows Services' to start the Exivity services after clicking Finish.
Silent install Web/UI node
The below example will silently install an Exivity Web/UI node:
Exivity_{version}_setup.exe /S ^
	/EXIVITY_PROGRAM_PATH=C:\Exivity\Program /EXIVITY_HOME_PATH=D:\Exivity\home ^
	/PSQL_INSTALLED=0 ^
	/MQ_INSTALLED=0 ^
		/MQHOST=mq.exivity.local /MQPORT=5671 /MQUSER=exivity /MQPASSWORD=My5pecia1pas9 /MQVHOST=exvt /MQSSL=1 ^
	/JOBMAN_INSTALLED=0 ^
	/SCHEDULER_INSTALLED=0 ^
	/API_INSTALLED=0 ^
		/PROXIMITYHOST=remote.api.local /PROXIMITYPORT=443 ^
	/WEB_INSTALLED=1